ပထမနည္း (က): +1 button (gadget)
ဒီေဆာင္းပါးမွာ သင့္ရဲ့ ဘေတာ့အတြက္ +1 Button ကိုညႊန္ျပေပးမွာျဖစ္ပါတယ္၊ အကယ္လို႔သင္ဟာ သင့္ရဲ့ Post အတြက္ +1 Button ကိုရွာေနတာဆိုရင္ Share buttons and use the +1 counter. ဒီေနရမွာ သြားပါ။ မည္သူတစ္ဦးတစ္ေယာက္မဆို သင့္ရဲ့ Blog ကို + လုပ္မယ္ဆိုရင္ သူတို႔ဟာ သူတို႔ရဲ့ သတင္းေတြကို မွ်ေဝရန္ သူတို႔အသိုင္းဝုိင္းကို အသိေပး မွ်ေဝရင္းသင္လဲလက္ခံရရွိမွာျဖစ္ပါတယ္။ ဒီေရးသြင္းခ်က္ေတြဟာ သင့္ရဲ့စာဖတ္ပရိတ္သတ္ကို လြယ္ကူေခ်ာေမာစြာ အသံုးျပဳတာလဲျဖစ္သလို သင္ကလဲ အသံုးျပဳနိုင္ပါတယ္။ သင့္ရဲ့ Blog မွာလဲ +1 Button gadget ေပါင္းယူထားရန္ ေအာက္ပါနည္းေလးကို ၾကည့္ပါ။
1. Layout မွာ Click ႏွိပ္ပါ။2. သင္အသံုးျပဳလိုေသာ ေနရာ Add a gadget ကို ကလစ္ႏွိပ္ပါ၊ ေနာက္မွျပန္ျပီးေနရာေျပားေပးလို႔လဲ ရပါတယ္၊ သင္ေနရာေျပာင္းလိုပါက ေမာစ္က ပိြဳင့္ကို၍ လိုရာကိုဆြဲယူ၍ေရႊေသာနည္းျဖစ္ေျပာင္းေပးနိဳင္သည္။
3. သင္၏ Blog မွာ + ကိုေပါင္းထဲ့ရန္ေအာက္မွာျမင္ေနရတဲ့ပံုက +1 Button Available for Dynamic Views နားက + ကို Click ႏွိပ္ပါ။
4. ေအာက္မွျပထားေပးတဲ့ပံုေလးလိို ေပၚလာတဲ့ Box ေလးထဲမွာ အရြယ္စားကို သင့္သလိုေျပာင္းျပိး ရင္ေတာ့ Save မွာ ကလစ္ႏွိပ္ပါ
ပထမနည္း (ခ): Google+ Badge
Google+ Badge ကိုသင့္ရဲ့ Blog မွာေဖၚျပလိုပါက သင့္အတြက္လြယ္သြားပါျပီး အထက္ကနည္းအတိုင္း Layout မွာ Click ႏွိပ္ပါ။
အကယ္၍ သင့္ Blog မွာအေျပာင္းလဲ ျပဳလုပ္ပါက Google+ tab ဟာလဲ အလိုေလွ်ာက္ေျပာင္းလဲေပးပါလိပ္မယ္။
သင္ Google+ Badge ကို Add မလုပ္ခင္သင္ရဲ့ Blogger Profile ကိုေသခ်ာေအာင္ Upgrade အရင္လုပ္ပါ၊ သိလိိုတာမ်ားကို ဤေနရာမွာ upgraded your Blogger profile to a Google+ profile. ၾကည့္ပါ။ ဤအဆင့္မ်ားကိုလုပ္ေဆာင္ရာမွာလဲ အထက္ကနည္းမ်ားကဲသို႔ ျပဳလုပ္ပါ။
1. Layout မွာ Click ႏွိပ္ပါ။
2. သင္အသံုးျပဳလိုေသာ ေနရာ Add a gadget ကို ကလစ္ႏွိပ္ပါ၊
3. သင္၏ Blog မွာ Google+ Badge ကိုေပါင္းထဲ့ရန္ေအာက္မွာျမင္ေနရတဲ့ပံုက Google+ Badge Available for Dynamic Views နားက + ကို Click ႏွိပ္ပါ။
ထို႔ေနာက္ေအာက္ပါကဲ့သို႔ Box ေလးၾကလာျပီး Save မွာ ကလစ္ႏွိပ္ေပးပါ။
| Size: | |
|---|---|
| Color Theme: |
Save Cancel Back
ပထမနည္း (ဂ) : Google+ Followers
အထက္ပါနည္းႏွစ္ခုကိုထဲ့ျပိးတဲ့အျပင္ေနာက္ထပ္ Google+ Followers ကိုပါထဲ့နိဳင္ပါေသးတယ္။Blogger Profile ကို Google+ profile သို႔ Upgrade ျပဳလုပ္ျပီးပါက သင္ရဲ့စိတ္ဝင္စားရာ ဝင္စားရာ အဖြဲ႔ေတြကို သင္ေရြးခ်ယ္နိဳင္ပါတယ္။ upgrade your Blogger profile to a Google+ profile, သို႔ေသာ္လဲ သင္က Google+ မွာ Private ကိုေရြးထားမိခဲ့ပါကသင့္ရဲ့ Blog မွာသူတိုလာျပိး သတင္း မွ်ေဝတာမ်ိဳးလုပ္မွာမဟုတ္ပါဘူး ထိုေၾကာင့္သင့္ရဲ့ Blog ကိုသင္ လူသိရွင္ၾကားျဖစ္ေအာင္လုပ္ထားဘို႔လိုပါတယ္။ သင္က သင့္ရဲ့ Blogger မွာ Google+ Followers gadget ကိုထဲ့တဲ့အခါမွာ သင့္ Blog ကိုဝင္ဖတ္သူက သင့္ Blog ကိုသူတို႔ရဲ့ Profiles မ်ားမွာ Add လုပ္တာမ်ိဳးကို လုပ္ေဆာင္နိဳင္ပါတယ္ အကယ္၍သူတို႔ သေဘာက်မယ္ဆိုရင္ေပါ့။ ဒါေၾကာင့္မို႔ သင့္ Gadget ဟာ Blogger ႏွင့္ Google+ ၾကားမွာ အလုပ္လုပ္ေဆာင္မွာျဖစ္ပါတယ္။ ဒါေၾကာင့္မို႔လို႔လဲ ၾကိဳက္ႏွစ္သက္သူမိတ္ေတြမ်ားဟာ သင့္ Blog ကိုသူတို႔အခ်င္းခ်င္းလဲ တစ္ယာက္ကိုတစ္ေယာက္ေလ့လာနိဳင္ျပိး မိတ္ေဆြဖြဲ႔တာမ်ိဳး သတင္းမ်ား မွ်ေဝတာမ်ိဳးကိုလုပ္ေဆာင္ၾကမွာျဖစ္ပါတယ္။
သတိထားရန္မွာ Gadget ဟာသူမွာရွိေနတဲ့ Google ကမိတ္ေဆြအေပါင္းသင့္းအားလံုးကို တစ္ျပိဳင္နက္ထဲမွာ အသံုးျပဳနိဳင္ၾကမွာျဖစ္ပါတယ္။ ဒီအဆင့္ကိုျပဳလုပ္လိုပါက ထံုစံအတိုင္း Layout မွာ ကလစ္ႏွိပ္ျပီး ဝင္ပါ။
Google+ Followers ယူရန္အတြက္ Layout ကေနဝင္ျပီး သင္ႏွစ္သက္ရာေနရာက Add a gadget ကိုကလစ္ႏွိပ္ေပးပါ။
ေအာက္မွာေဖၚျပထားတဲ့ ပံုက Google+ Followers က + မွာ ကလစ္ႏွိပ္ေရြးေပးပါ။ က်န္တာေတြကေတာ့ အားလံုး အထက္မွာျပထားတဲ့နည္းေတြနဲ႔ အတူတူပါဘဲ။
အစမွာေတာ့ သင့္ရဲ့ Gadget ထဲမွာ ဘယ္သူမွရွိေနမွာ မဟုတ္ေသးပါဘူး သင့္ Blog အေပၚမွာ သင္ဘယ္ေလာက္ လူစိတ္ဝင္စားေအာင္ လုပ္နိဳင္ လဲ အေပၚမွာ မူတည္ပါတယ္။
ဒုတိယ နည္း Posts မ်ားကို Google+ သို႔မွ်ေဝနည္း
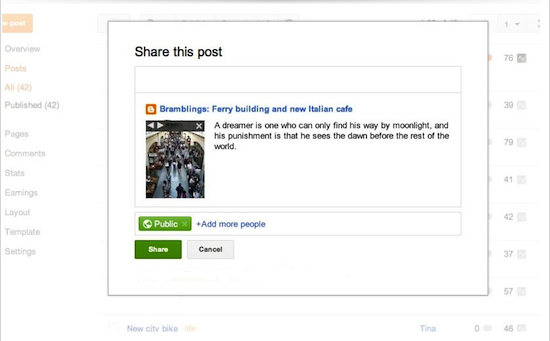
ဒီလို Post ေတြကို Google + မွာမွ်ေဝၾကဘို႔အတြက္ Blogger ရဲ့စည္းမ်ည္းမ်ားကို သင္အရင္ဖတ္ထားဘို႔လိုပါတယ္ သို႔မဟုတ္ပါက သင္ဒီလို Post မ်ားကိုမွ်ေဝခြင့္ ရမွာမဟုတ္ပါဘူး (စာအုပ္ၾကီးတိုင္းေရးသားျခင္းမွ်သာျဖစ္သည္) Google+ User Content and Conduct Policy.
မွာဝင္ေရာက္ေလ့လာၾကပါကုန္။ Blogger ရဲ့အၾကီးမားဆံုးအေျပာင္းလည္းကေတာ့ မိတ္ေဆြမ်ားရွာေဖြျခင္းႏွင့္ သူတို႔သတင္းမ်ားဖတ္သူမ်ားႏွင့္ ဆက္သြယ္ၾကျခင္းမ်ားျဖစ္ပါတယ္။ Post ေတြကို Google+ ကေနမွ်ေဝျခင္းျဖင့္ သင္ဟာလူေဘာင္အဖြဲစည္းသစ္ကို ရရွိနိဳင္ျပိး သူတို႔အားလံုးက သင္ကိုသိရွိလို ရွာေဖြလိုၾကမွာလဲ ျဖစ္ပါတယ္။ သင္အကယ္၍ သင့္ရဲ့ Blog ကို upgrade your blog to connect with Google+ လုပ္ျပီးသြားပါက သင့္ရဲ့ Google+ profile မွာရွိတဲ့သင့္ရဲ့ အမည္စရင္းေတြေရးသြင္းလာၾကမွာျဖစ္ျပီး သင္ရဲ့စာေပရဲ့ သတင္းေတြဟာလဲ အက်ိဳးျပန္လည္သက္ေရာက္လာမွာျဖစ္ပါတယ္။ အဲဒီအခါ သင့္ရဲ့ စာရြက္တစ္ရြက္နဲ႔ သင့္ရဲ့ ေသခ်ာတဲ့ Blogs ေတြကို ေပါင္းသင္းဆက္ႏြယ္ဖို႔ေရြးခ်ယ္လာၾကမွာျဖစ္ပါတယ္။ အဖြဲ႔စည္းမ်ားကလည္း ဘယ္လို သင့္ မွ်ေဝလိုေသာ Post ကိုေရြးျပီး Add Custom Message မွလဲ မွ်ေဝနိဳင္ပါတယ္။ အနာဂတ္မွာ Blogger ႏွင့္ Google+ ေပါင္းစပ္မွဳႏွင့္အတူ Google+ profile ႏွင့္ Google+ ေတြကို Blogs ေတြမွာခ်ိက္ဆက္နိုင္မွာျဖစ္ပါတယ္။ ဒါေၾကာင့္ common name ရဲ့ေအာက္မ်ာမိတ္ေဆီမ်ားအခ်င္းခ်င္း မွ်ေဝခံစားနိဳင္မွာျဖစ္ပါတယ္။ Google+ ကိုစတင္ရန္သူ႔ အေပၚမွာကလစ္ႏွိပ္ပါ။ ေနာက္တစ္ခုက သင္ရဲ့ ကိုပိုင္ Post ေလးေတြကို ဆက္တိုက္ေရးေပးေေနဖို႔လိုပါတယ္။ ျပီးေနာက္ ျပည္သူေတြဆီကုိ မွ်ေဝေပးပါ။

အကယ္၍ သင္ရဲ့ Post ကို Share လုပ္ျပီးသြားလို႔ ဒီ Share Box ကိုျပန္မေပၚေစလိုပါက Setting ကေနသင္ေျပာင္းယူနိဳင္ပါတယ္။ Blogger ထဲမွာရွိတဲ့ Google+ ကိုသြားျပီး Check ႏွင့္ Unchecking Bottom ကေနလုပ္လို႔ရပါတယ္။
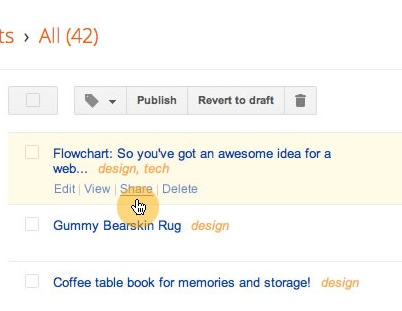
Share ကိုအကယ္၍ သင္ကအျမဲ Share လုပ္တာမ်ိဳးမဟုတ္ပါက ေအာက္ကပံုမွာ ျပထားတဲ့ေနရာကေန Share လုပ္နိဳင္ပါတယ္။

တတိယ နည္း Google+ Comments အေၾကာင္းသိေကာင္းစရာ
Google+ Comments ဟာ Blogger ေပၚကေန မွန္ခ်က္ေပးတဲ့စနစ္ကိုေရြးခ်ယ္ထားတဲ့နည္းလမ္းေလးျဖစ္ပါတယ္။ သူတို႔ရဲ့ေရးသားမွဳေလးေတြကို Blogger Profile ကေန Google+ ကိုအျမဲ ဆန္းသစ္ေနေအာင္လုပ္ေဆာင္ေပးေနနိဳင္တာျဖစ္ပါတယ္။
- Comments ေတြက သင့္ရဲ့ Blogger ရဲ့ Post ဖန္တည္းေပးပါတယ္။
- Comments ေတြက Blog Post ေပၚမွေနျပီး Google+ ကို Share လုပ္ေပးေစပါတယ္။
- သင့္ရဲ့ Blog Post ကို Google+ မွာ ဆက္သြယ္မွ်ေဝေပးပါတယ္။
Google+ ကိုစတင္အသံုးျပဳ၇န္အတြက္ သင့္ရဲ့ Blog ထဲက Google+ Comments မွာ ကလစ္ႏွိပ္ပါ။
ဒီလုပ္ေဆာင္မွဳအတြက္သင္သတိထားရမွာကေတာ့ ဒီလိုလုပ္ေတာင္မွဳေတြကိုေဖၚျပေပးရန္ connect your blog to Google+ကို သင္ေလ့လာဖတ္ရွဳရမွာျဖစ္ပါတယ္။
Google+ Comments ၏ အဂၤါရပ္မ်ား
Google+ Comments ဟာ Blogger comments နဲ႔ထူးမျခားနားေလးပါ သူမွာအေရးၾကီးတာေလး ၅ ခ်က္ေလာက္ပိုတာဘဲ ရွိပါတယ္။- Blog ေပၚမွာ Comment ေရးေတာ့မယ္ဆိုရင္ Google+ ကို Share လုပ္ေပးဘို႔ Default ကိုစစ္ေပးပါ။
- Google+ ရဲ့ Posts ေတြဟာ Blog ရဲ့ Post ေတြနဲ႔ခ်ိပ္ဆက္ျပိး Blog ရဲ့ Post ေတြကိုေဖၚျပေပးမွာျဖစ္ပါတယ္။
- မူရင္း Comment ကို Google+ ကို Share လုပ္မယ္ဆိုရင္ Google+ ရဲ့ Vice Server ကေန Comment ေတြကို ျပန္စာေရးေပးနိဳင္ျပိး မူရင္း Comment ကိုသာ အမ်ားျပည္သူေတြကို ရွယ္ခဲ့တာျဖစ္ပါတယ္။
- Blog ေ၇းသူက Shared မလုပ္ခဲ့ဘူးဆိုပါက ဒီ Comment ဟာ ရွီေနရမဲ့ေနရာမွာ ရွိနမွာ မဟုတ္ပါဘူး။
- Post တစ္လုကိုေရးသူအေနနဲ႔ Google+ ကေနျပိးေတာ့ သတိေပးတာကိုေတြ႔ရမွာျဖစ္ပါတယ္။
A Google+ Comment under a blog post
The same comment in Google+
အကယ္၍သင္က သင့္၏ URL ကိုအေျပာင္းမလဲ လုပ္မယ္ဆိုလဲ Google+ Comment ဟာရွိေနမွာျဖစ္ပါတယ္။ Google+ Comments FAQ မွသိလိုသမွ်ကိုရွာၾကည္ပါ။
စတုတၳနည္း သင္လို Blogger မ်ားႏွင့္ေတြ႔ဆံုပါ မွ်ေဝပါ
စတုတၳနည္း မွာေတာ့ေအာက္ပါ Video ေလးကိုၾကည့္ပါ
ဒီ Video ေလးၾကည့္ျပီးရင္ ဒီမွာ ကလစ္ႏွပ္ျပီးဝင္ပါ http://www.google.com/intl/en/+/learnmore/communities/ ဝင္ျပီးလွ်င္ ေပၚလာမဲ့ စာမ်က္ႏွာ အသစ္က Browse Communities မွဝင္ေရာက္နိဳင္ပါတည္။ ထို႔ေနာက္ထပ္မန္ေပၚလာမဲ့စာမ်က္ႏွာမွာ သင္စိတ္ဝင္စားေသာအုပ္စုကိုေရြးခ်ယ္ဝင္ေနာက္နိင္ပါသည္။
ပဥၥမနည္းသည္Hangoutsကိုအသံုးျပုနည္းျဖစ္ပါသည္
ေအာက္ပါ Video ေလးကိုၾကည့္ပါ
Group conversations are better than ever

ဒီ Hangouts ကိုသံုးဘို႔ ေအာက္မွာ ေဒါင္းလုပ္ယူနိဳင္ပါတယ္။

Gmail ထဲမွာ Hangouts ကိုသံုးနိဳင္ပါတယ္။ အီးေမးပို႔ေဆာက္ေျပာေနတာ ကိုရပ္ျပိး သင္မိတ္ေဆြေတြကို တိုက္ရိုက္ေခၚဆိုနိဳင္ပါတယ္။ သင့္ Gmail ထဲက ေအာက္ပါပံုေလးေနရာ မွာ ကလစ္ႏွိပ္ျပီး သင့္ရဲ့ Gmail ကို Upgrade လုပ္ေပးလိုက္ပါက သင္ စတင္အသံုးျပဳ နိဳင္ပါျပီ။
သင္ႏွင့္ သင္၏မိတ္ေဆြတို႔ Hangouts ကို Apple devices မွာ Google ကိုအသံုးျပဳျပီး ဆက္သြယ္နိဳင္ၾကပါျပီ။ iPhone, iPad and iPod touch. တို႔အတြက္ Download the app, ယူနိဳင္ပါတယ္။

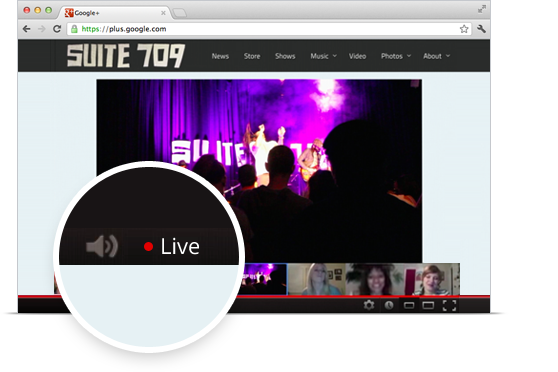
Live-stream ပြဲေတြကိုလဲ Hangouts ကေနျပီး ၾကည့္နိဳင္ေနပါျပိ။
ဆဌမ နည္း
Google+ ေနျပိးသင့္ရဲ့ Post မ်ားကိုျပည္သူမ်ားကိုရွင္းျပေပးနိဳင္ပါတယ္။ ဒီ Post ကိုေရးသားသူကေတာ့ Software Engineer +Malte Ubl ျဖစ္ပါတယ္။ သူေျပာတာကေတာ့ Blogger ကေန Google+ mentions ကိုသံုးျပီးစကားဝိုင္းတစ္ခုအျဖစ္စကားေျပာဆိုရင္ဒါဟာ အေကာင္းဆံုးနည္းဆစ္ခုျဖစ္တယ္လို႔ ဆိုပါတယ္။ လူေတြရဲ့ အာရံုစူးစိုက္မွဳဆြဲယူရန္အေကာင္း နည္းသစ္တစ္ခုကို ေပးတယ္လို႔လဲ ဆိုပါတယ္။ အကယ္၍သင္က Blogger ကေန ပို႔စ္ တစ္ခုကို Google+ ကို share your post တင္ေတာ့မယ္ဆိုရင္ သူတို႔ရဲ့ Hangouts ကပို၍လြယ္ကူေအာင္လုပ္ေျပးျပီး သင့္ရဲ့ေျပာခ်င္သမွ်ကို အမ်ားျပည္သူေတြရဲ့ ShareBox ဆိကိုအေရာက္ပို႔ေပးမွာျဖစ္တယ္လို႔ ဆိုပါတယ္။
လူတစ္ဦးတစ္ေယာက္ကို သင္ေျပာခ်င္တာ ေျပာဖိုရန္ သင့္ရဲ့ Blogger Post Editor သင္ေျပာခ်င္ေသာသူ၏ အမည္ေရွ႔တြင္ + ကိုထဲ့ရိုက္ေပးပါ
+Gregory Fair ကိုေက်းဇူးတင္သင့္ျပီး မသိတာကိုေမးျမန္းနိဳင္ပါတယ္။ connect your blog to Google+ ဒီေေနရာကေန သင္ဝင္ျပီး သင့္ Blog မွာလဲဖတ္ၾကည့္နိဳင္ပါတယ္။
အထက္ပါနည္း ၆ နည္း၏ မူရင္းမ်ား

Add Google+ buttons and gadgets
Help readers follow and share your posts on Google+ with the +1 button, Google+ badge, and Google+ Followers gadget. Visit the Layout tab, click "Add a gadget," and select the Google+ gadgets you'd like to add.

Manage comments in one place
Turn on Google+ Comments to bring comments on your posts together in one place, including posts about your content in Google+.

Share your posts with a new audience
Share your blog posts publicly
on Google+, and encourage your readers to re-share. Add hashtags when
you share to tie your posts to relevant themes and trending topics,
increasing their visibility.

Connect with readers face-to-face
Host a group video chat conversation with your readers in a Google+ Hangout. You can livestream it and post the final video right on your blog.

Meet others like you
Participate in Google+ Communities related to your blog. You can meet people interested in similar subjects and discover new topics to cover.

Spark conversations with Google+ mentions
Add Google+ mentions
to your posts to get someone's attention. Your mention will link to
their Google+ page or profile, and you can notify them when you share.


No comments:
Post a Comment